Viewing: Composition - View all posts

Exporting a Song in GarageBand (iPad) 

So you have your brand new iPad and you wrote a brand new song in GarageBand. What now?
 
The GarageBand app that comes free on the iPad has functionality that is a bit different from the full program that comes on your Mac. If you are trying to figure out how to export your song so you can share it with friends, then this blog is for you!
 
To export an MP3 (AppleLossless) file from GarageBand for iPad, follow these steps:
 

1. Open your GarageBand project.
2. Ensure that your project is complete and ready for export. Make any necessary adjustments or edits before proceeding.
3. Tap the "My Songs" button in the top-left corner of the screen to view your project list.
4. Press and hold the project you want to export until a menu appears. Select "Share" from the menu.
5. In the Share menu, choose "Song" to export the entire project as an audio file.
6. Next, you'll see different sharing options. Select "Audio File."
7. GarageBand will prepare your project for export. Once done, a new screen will appear with options for file format and quality.
8. Tap the "Compress" option to choose the desired file format. Select "MP3" from the list. Note that the quality settings may vary depending on the version of GarageBand you're using.
9. Adjust the quality settings if necessary. Higher quality settings will result in larger file sizes.
10. Tap "Share" in the top-right corner of the screen.
11. A new menu will appear, allowing you to choose where to save the exported file. You can save it to your Files app, iCloud Drive, or other cloud storage services.
12. Select the desired location and tap "Save" to initiate the export process.
13. GarageBand will render and export your project. The duration of this process may vary depending on the complexity and length of your project.
14. Once the export is complete, you can access the file in the chosen location.

🤘😎🤘

Using GarageBand (iPad) 

If you own an iPad then you get an app of GarageBand for free! Garageband is a super fun and powerful DAW that will lead you into the world of writing and producing music in Logic Pro. However, if you take the time to learn GarageBand, there is potential that you won't need anything else because it is super powerful! 
 
You might be surprised to learn how many albums are created with GarageBand. However, if you are new to the GarageBand world, at first glance it can be a bit intimidating. Let's jump in with some basics to get you started!
 
Using GarageBand on the iPad.
 
1. Launch GarageBand: Tap on the GarageBand app icon to open it. 

2. Choose a Project: When you open GarageBand, you'll be prompted to create a new project. You can select various options like "Keyboard Collection," "Guitar Amp," "Drummer," or "Audio Recorder." Choose the one that suits your needs or tap "Empty Project" for a blank canvas.

3. Explore the Interface: GarageBand's interface consists of various sections and tools. Familiarize yourself with the different elements like the "Tracks View", "Library", "Smart Controls", and "Editor". You can swipe left or right to navigate between these sections.

4. Add and Edit Tracks: To add a new track, tap the "+" icon in the Tracks View. GarageBand offers a range of options, including software instruments, audio recordings, drummers, or external MIDI devices. Choose the desired track type and customize it using the available settings.

5. Play Software Instruments: If you're using a software instrument track, tap the keyboard, drum pad, or other virtual instrument icons to play notes or trigger sounds. You can also use external MIDI keyboards or controllers for more expressive playing.

6. Record Audio: To record audio, tap the red record button in the control bar. GarageBand allows you to record vocals, guitars, or any other instruments using the built-in microphone or an external audio interface. Adjust the input settings and monitoring options to ensure optimal recording quality.

7. Use Loops: GarageBand includes a vast library of pre-recorded loops that you can drag and drop onto your tracks. Explore the "Loop Browser" in the Library section to find loops that match your desired style or genre. Experiment with different combinations and arrangements to create unique musical ideas.

8. Edit and Arrange: GarageBand provides editing tools to refine your recordings. Tap the "Edit" button to access features like trimming, splitting, looping, or adjusting volume and pan. Use the Arrange section to move and arrange your recorded regions, loops, or MIDI notes to create a cohesive composition.

9. Apply Effects: Enhance your tracks using GarageBand's built-in audio effects and processors. Open the Smart Controls section to access parameters like EQ, reverb, compression, or modulation effects. Experiment with different settings to shape your sound and add depth to your mix.

10. Mix and Master: Once you're satisfied with your tracks, use the Mixer section to adjust the individual track levels, panning, and effects sends. Pay attention to achieving a balanced mix and use automation to create dynamic changes. Consider using the Master Track to apply global effects and control the overall output.

11. Export and Share: When your project is complete, tap the "My Songs" button to view your projects. Press and hold the project you want to export, select "Share" from the menu, and choose the desired export option. You can export your project as an audio file, share it via AirDrop, upload it to SoundCloud, or send it to other apps on your iPad.

Remember, this is just a basic overview of using GarageBand for iPad. The app offers numerous, advanced features and capabilities, such as virtual drummers, automation, MIDI editing, and more. Explore and experiment with different tools and techniques to unlock the full potential of GarageBand and create incredible music. 
 
 
...and then the implied "step 12" is to unleash your creativity!
 
I hope you find the time to explore through the eyes of a child and have some fun with this at some point.
 
🤘😎🤘


Recording a Song in GarageBand (iPad) 

So you have your brand new iPad which comes with GarageBand for free! However, the functionality of GarageBand on the iPad is a bit different than the version that comes on your computer. So, if you are confused, no biggie because I have the steps below for you to follow!

Recording in GarageBand for iPad is a straightforward process that allows you to capture your musical ideas and create professional-sounding tracks. Here's a step-by-step guide to help you get started:

Step 1: Launch GarageBand
Open the GarageBand app on your iPad. If you don't have it installed, you can download it from the App Store.

Step 2: Create a New Project
Tap on the "+" icon to create a new project. Choose the option that suits your needs, such as "Keyboard Collection" or "Guitar Amp."

Step 3: Choose the Instrument and Track Type
Select the instrument or track type you want to record. GarageBand offers a variety of options, including virtual instruments, audio recordings, and loops.

Step 4: Set Up Your Input Device
If you're using an external microphone or audio interface to record, connect it to your iPad using the appropriate adapter. GarageBand supports various external devices, including USB and Lightning-compatible interfaces.

Step 5: Enable Monitoring
To hear the audio input while recording, make sure the monitoring option is enabled. Tap the headphone icon in the control bar at the top of the screen to turn monitoring on or off.

Step 6: Adjust Input Settings
Tap the settings icon (gear icon) in the control bar to access the input settings. Here, you can adjust input levels, enable effects, and set the input source. Make sure your input levels are set appropriately to avoid clipping or distortion.

Step 7: Start Recording
Tap the red record button in the control bar to start recording. Play your instrument or sing into the microphone to capture your performance. You can record multiple takes, and GarageBand will automatically create regions for each take.

Step 8: Edit and Enhance Your Recording
After recording, you can edit your performance by tapping the "Edit" button. GarageBand provides various editing tools, including trimming, splitting, and adjusting volume levels. You can also apply effects, such as reverb or EQ, to enhance your recording.

Step 9: Add Additional Tracks
To create a multi-track recording, tap the "+" icon in the Tracks View and choose the instrument or track type you want to add. Repeat the recording process for each track and adjust their settings as needed.

Step 10: Mix and Export
Once you've finished recording and editing your tracks, you can mix them to achieve the desired balance and add effects to individual tracks or the overall mix. When you're satisfied with the final mix, you can export your project as an audio file or share it directly to various platforms, such as SoundCloud or iCloud.

GarageBand for iPad offers a range of features and capabilities beyond basic recording, such as virtual instruments, drum patterns, and MIDI support. Exploring these additional features can help you create more complex and polished recordings.

Remember to experiment and have fun while recording in GarageBand. With practice and creativity, you can produce high-quality music right from your iPad.

🤘😎🤘

Fang! 

My collaboration with FANG is live! FANG is a menswear brand (NYC) that observes and celebrates the contemporary male experience through their modern clothing line and I am honored that they choose 4 of my songs to represent their fall release. I am proud to be a part of their fall campaign and their sophisticated take on this world that we share. Check it out...!

Born in New York City and inherently cultured,  FANG is a menswear brand that observes and celebrates the contemporary male experience — the feeling of being masculine, feminine, and everything in between. Conventional men's clothing suggests either confinement or unshapeliness, almost something to hide; the FANG collections challenge this status quo by bringing forward fashion designs that are aesthetically-inclined and forward-thinking while simultaneously offering comfort and support for every body.


Dolby Atmos! 

I have discovered Dolby Atmos and am hooked! Spatial audio has long been a dream and tv’s and consumer level speakers are starting to be Atmos compatible. Logic Pro 10.7 allows you to mix for Atmos and there are even rumors that VSX (a genius product by the team at Steven Slate) will be coming out with a Dolby Atmos mixing room. Oh, I so hope that this is true! 

Atoms = 9.1 surround sound. The 9 speakers are placed in specific locations surrounding the listener on each side as well as above and below which essentially drowns the listener in frequencies designed just by people like me! 

I mean it is Dolby and Apple! That alone is access to a vibrant enough community but when you start adding services like YouTube premium and Tidal into the mix, it is hard not to jump on board. Youtube alone is enough to convince me. 

To help ease my workflow, and learn from the masters, I often times hire a mixing and a mastering engineer. I have been super happy with the formula I have developed however I just sent my first mix off to Audio Animals to try out their Atmos mixing and mastering service. There are a few other rumors about an Atmos premastering service, however Audio Animals is the first team I have encountered with clear, concise, and affordable pricing options. Digging through their website I really enjoyed the a la’ carte approach for the various add ons. I however, went for the full mother load while screaming to an empty room..."give me all the add ons!" I look forward to receiving a full Atmos mix and master, a regular .wav stereo mix and master, mp3, and stems. Rather than a variety of stem configurations, I decided to get all the individual processed tracks, which is a killer option. That will give me the ability to create any stem configuration that I may need  down the road and is going to greatly enhance what I do! .

I am really looking forward to having some fun with Audio Animals. It sounds like they are open to creativity and creativity is what it is all about!


...stay tuned


:)

How Big Perm transformed into Cry Baby 

The pandemic has brought a couple of exciting projects into my life that I am grateful for. One of them being a collaboration with the Boise State Jazz Orchestra. Derek Ganong, their fearless leader, dreamed up a collaboration with the BSU jazz musicians and independent composers to create a unique collaboration involving mixed media. The idea was to approach big band music through the eyes of EDM. The challenge was that the piece, employing EDM techniques, needed to be able to be performed live. With social distancing protocols, this became difficult. The live performance had to be bagged and the focus shifted to recording a cd of the music to stream for the Gene Harris Jazz Festival.

However, with social distancing, even recording a cd with a jazz orchestra was a bit of a struggle. Players ended up recording their individual parts on their own and then submitting them for a final mix. Can you imagine adjusting intonation and tuning without having a full ensemble as a reference point? How about even working on groove? We see videos done this way all the time on YouTube and it takes actually going through the process to understand the hurdles one has to jump through to pull this off. I am glad I had Derek to work through this process with and am excited about the final outcome. 

I started the project wanting to re-envision one of my older pieces. The original version of Big Perm was always a tongue-in-cheek protocol in my eyes; a "finished sketch" of sorts. I thought this would be a great opportunity to see what new life I could squeeze out of an old project. I was surprised to see that, under the influence of this project, Big Perm became a whole new piece. Cry Baby is Big Perm re-envisioned. Cry Baby is the sibling to Big Perm with the same DNA seen through a blending of different perspectives. This is the power of collaboration that I love so much. Collaboration opens your eyes to new ideas and forces new experiences. For me, collaboration is the right hand to creativity.

So with that in mind, I am proud to share the Boise State Jazz Orchestra, under the direction of Derek Ganong, debuting Cry Baby as part of the Gene Harris Jazz Festival!

*click here for the SoundCloud Link*


Bumper Reels 

Film festival season is upon us! But honestly, when isn't it film festival season? Not sure, but I did get the opportunity to work with the Lady Filmmakers Festival this year once again doing music for their Bumper Reel. Last year I was able to attend the festival, nestled in Beverly Hills 90210, CA, and was blown away by the films I saw as well as the associated art, music, and photography. They even let me performed on my vibraphone for one of the after-hour shindigs and this year I will be doing a performance via Skype! I gotta admit, I kinda look forward to not having to move my instrument to perform. These streaming performances could be my new jam.

...here is the bumper.


Shit's so Cool 

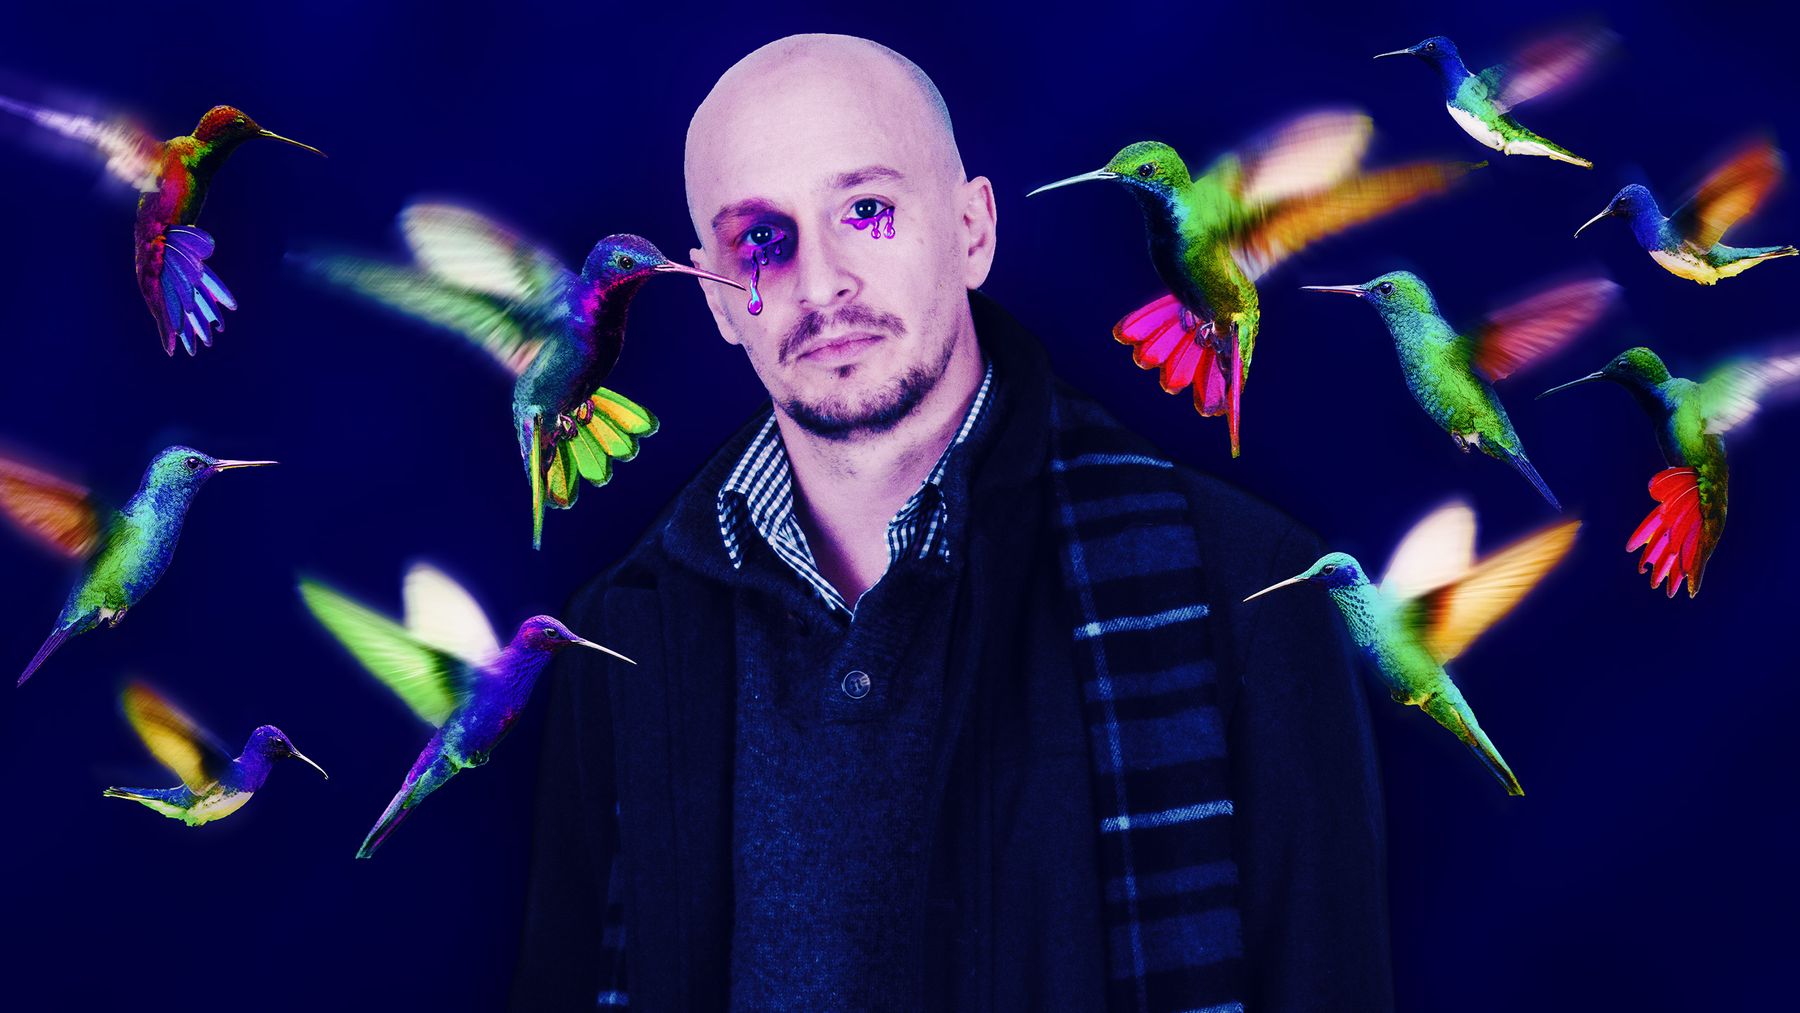
Oh DAYUM(!) I am excited to share the album cover for our new single, "Shit's so Cool". This time around I decided to collaborate with my good friend and bandmate, Ryan Donahue (Saint Monday, The Dirty Moogs). The photo below is what Ryan was given as "material to work with". I of course had to go get punched in the face first, bruise appropriately, and then pose. 


The song was originally titled "Sweet Hummingbird Food" because of the lyric that states "Girl, you're a tear on a cheek, sweet hummingbird food". I worried though that the title sounded a bit too "bluegrass" and actually misrepresented the flavor of the song. It didn't take me long to realize that if I work with an artist like Ryan, he would be able to visually represent that lyric, leaving me free to call the song by what I at one time considered as an alternative title, "Shit's so Cool".

So, the pic below is the final version for the cover of the single! I am so proud to have this represent my work! Thank you some much Ryan for your artistic insight! The single will be out soon and I can not wait to share it with the world!

Oh hey Ryan, "You're the only reason why all this shit's so cool"  *wink wink*


Indie Film 

So this Covid-19 thing has been crazy, right? The whole experience has been so confusing, not knowing what to do and how to act appropriately in a world that changed overnight. Being stuck at home has forced me to finish a backlog of projects and clear my mind and reality in a way that only forced isolation can. I even caught myself cleaning all of my baseboards with Q-tips. 

It is weird being in my mid 40's and essentially grounded. 

Fortunately, technology has progressed in such a way that it allowed a collaboration with Apricott Films to come to life! This turned out to be a fun little project about the moment the world shut down. This short film taught me and the team how to push through some creative challenges and develop certain skill sets that weren't needed in our old reality. I am excited to carry these skills forward into whatever our new reality becomes.

Art adapts and grows. Art allows us to still be heard when the rest of life and the world are shut down. What were you doing when Covid-19 hit? Were you stuck anywhere? Did you survive the Toilet Paper Shortage of 2020? Can you relate to the three stories in this film...

It was fun writing the music and doing the sound design for this little gem. It helped me to stay connected to friends and kept me active in a time when activity was difficult to accomplish.

As a side note, the music in this film provides some insight into Project213's next release. It was used as thematic material allowing this film to be a glimpse into a moment in time we all shared while at the same time providing a taste of what's to come....from Project213.

Webseries 

The creators of the comedy web series Vagina Town have released season 1 for streaming on YouTube! I had a blast composing music for the show as well as functioning as the music supervisor. When you watch the series you may even catch me acting in a couple of episodes :). That is what is so cool about indie projects; with the right crew you get to dip your hands into a little bit of everything. Yes, this was the right crew and so many memories were made on this project. Check out the trailer and then set some time aside to binge watch all 6 episodes!


This project was filmed exclusively in Boise, Idaho. You might recognize some of the locations from around town and some you won't recognize, like my house. Everything good doesn't have to come to an end though. If you liked the series please consider donating some $$$ to help push season 2 through. Pick an amount you can afford to donate at  Vagina Town TV. Oh, and btw, ' Naughty Jenny' was born out of episode 5. Can you spot an early version of the song?

Xylophone! 

The cool thing about being a composer for film and television is that I need to stay up on as many genres of music as possible. There is so much to learn that sometimes I just gotta take a day off of everything else to just dig into YouTube and study. As part of a music history course that I teach for the College of Southern Idaho, I have a chapter on world music. Check out this video that I shared with my class about the importance of the xylophone to a small African community. This slice of life documentary really highlights some massive cultural differences along with providing a cool authentic soundtrack.